I used Pacific Point, Creamy Caramel, Wild Wasabi, Basic Gray and Basic Black card stock plus Autumn Meadows DSP (retired). The corners are die cut with the Cuttlebug Vintage corners, the center die cut is a Labels Nestie, the bird was punched with the Bird & Branch Punch from SU! and the pine branches were punched with Martha Stewart's Branch Punch. Thanks for stopping by!!!!
Tuesday, November 30, 2010
Nevada State Bird (MMTPT122)
I used Pacific Point, Creamy Caramel, Wild Wasabi, Basic Gray and Basic Black card stock plus Autumn Meadows DSP (retired). The corners are die cut with the Cuttlebug Vintage corners, the center die cut is a Labels Nestie, the bird was punched with the Bird & Branch Punch from SU! and the pine branches were punched with Martha Stewart's Branch Punch. Thanks for stopping by!!!!
Monday, November 29, 2010
December 2010 Club Projects
Simple Flower (CAS95)
Sunday, November 28, 2010
CASEing Kris (FS199)
Saturday, November 27, 2010
Charlie Brown Tree (C4C65)
Magazine CASE
Snow! (C4C65)
Friday, November 26, 2010
Favorite Food (TSC1126)
Thursday, November 25, 2010
CASEing Pat (CCEE1047)
Wednesday, November 24, 2010
From the Heart (DDMCC03, SC308)
Labels:
Musical Card Challenge,
Sketch Challenge
Tuesday, November 23, 2010
Tea-rriffic! (MMTPT121)
Pipsqueak
Cardinal Tutorial
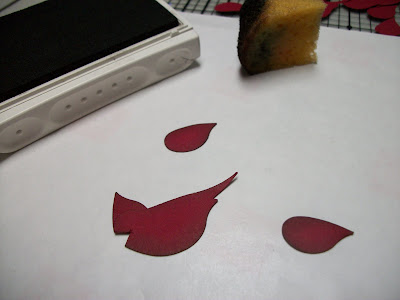
I've been asked to explain how I made the cardinal for yesterday's Clean & Simple Challenge card. I found instructions online, but now I can't find them, and I wanted to time myself anyway, so I made this picture tutorial. While the photos were uploading, I made a few more cardinals. After I took all these photos, I timed myself and it took less than 5 minutes to create one bird, but that was with all the pieces already punched. With another minute or two to punch those pieces, you've got yourself a birdie!
Please forgive the glare in the first couple of photos. I use the glass cutting mat in my work space. I cut scraps of Cherry Cobbler card stock into 1" and 3/4" strips to be able to insert them into the Bird & Branch Punch easily. The wider strips are for the bird body and the narrower for the wings.
I also use scraps of More Mustard and Basic Black for the beak and the area around the beak. (Does that black part have a name?)
I trim off about 1/3 of the bottom of one wing. Cutting the beak out of the black piece, I use a narrower cut than I do on the red so that no red will show.
After adhering the top (crop?) to the back of the head, I sponged the bird and the other two wings with Early Espresso.
Now, I adhere the beak behind the main body that has the beak cut out. Remember to make this cut just a little wider than you do on the black piece.
Adhere the black piece. Remember to make the cut narrower than on the red when cutting out the beak.
Adhere one wing behind the body (adhesive on the body) and one wing on the front of the body (adhesive on the wing). I added a tiny black half pearl for the eye.
Turn it over and attach a Dimensional to the back so that it will be popped up on your project.
You could use the branch on the Bird & Branch punch, but I thought the Martha Stewart Branch Punch looks more like a Christmas tree.
The bird I made while taking all these photos is on the top. When I made this other one, I timed myself, and it took less than five minutes. Of course I had all the pieces punched already. Add punching time, and it should take only about six or seven minutes to make one cardinal! I hope this helps!!! Thanks for stopping by!!
Monday, November 22, 2010
Welcome Christmas (CAS94)
This card is for the Clean & Simple challenge which was to do sponging. This card actually only took about 10 minutes to make. I'm getting good at making those cardinals! In fact, I made an extra one while I was making this card, and the card still only took about 10 minutes! I did some reverse masking and sponged the small oval with Always Artichoke, I punched the branches from Always Artichoke card stock. I made the cardinal and sponged him and popped him up on a dimensional. The sentiment is from "Heard from the Heart." Everything except the branch punch is from Stampin' Up! Thanks for stopping by!
Friday, November 19, 2010
November 2010 Stamp Camp Projects
I started to upload these yesterday, but had to get ready for Stamp Camp. Here's what we made:
This is a simple card, but the technique was important. We used Crayon Resist or Wax Resist technique. My second card that I made to demonstrate turned out better though. It has less white. You have to use glossy white card stock, stamp with Stazon and highlight with a white crayon; then, you sponge ink all over (in one direction). After that, you use a tissue to rub off the wax or crayon leaving the highlights. It's supposed to look like the star is shining down on the Holy Family. Everything is from Stampin' Up!
This card is a CASE of the sample in the Holiday Mini. Instead of using the tinsel garland, we used the Dotted Scallop Ribbon Border Punch with a line of Chunky Glitter down the middle. The image was stamped in Soft Suede on the Crumb Cake tag, then it was stamped with Baja Breeze on Whisper White, cut out, sponged and popped up on the tag. Everything here is from Stampin' Up! too.
The info for this one may be found in my post, "CASEing Greenie". I thought it turned out so cute, I used it for a Stamp Camp design! Everything here is from Stampin' Up!
I basically used this week's Sketch Challenge card for this, except that I eliminated one matted layer. See my "Lotta Layers" post for more info on this one. I used a Cuttlebug EF and an EK Success Punch, but everything else is from Stampin' Up!
This was already posted as "Stamp Camp Project" because I used it for a challenge last week. I love Punch Art!!! Everything here is from Stampin' Up! Thanks for stopping by!!
Thursday, November 18, 2010
Fall Synpathy (CCEE1046, TSC1119)
Labels:
CCEE Challenge,
Twisted Sistahs Challenge
Wednesday, November 17, 2010
Lotta Layers (SC307)
Tuesday, November 16, 2010
I stopped on the way... (MMTPT120)
I used the Birthday Bakery hostess set with liquid applique for the frosting. The background was embossed with the Cuttlebug Happy Birthday folder and the rose is store-bought. Thanks for stopping by!!
Monday, November 15, 2010
Lori's Sketch (CAS93)
CASEing Angela (FS197)
Saturday, November 13, 2010
Two challenges (DDMCC02, WWWXMAS)
Stamp Camp Project
Friday, November 12, 2010
New puppy
CASEing Greenie (QFTD35)
Thursday, November 11, 2010
Yellow Flowers (CCEE1045)
Early Christmas
One More Teapotter Card
Wednesday, November 10, 2010
Peace on Earth (SC306)
Tuesday, November 9, 2010
On My Mind (MMTPT119)
Monday, November 8, 2010
Joy (TSC1112)
Subscribe to:
Posts (Atom)