I was asked how I made the flower on my Mojo Monday Sketch Challenge card. I could have just put a link to a blog where I found a video tutorial, but I did mine slightly differently, so I made a picture tutorial. I hope this helps.

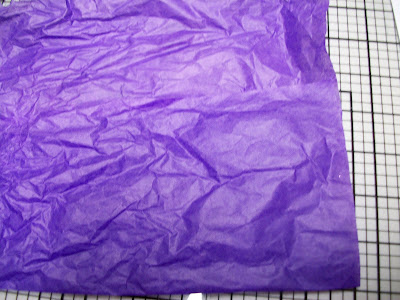
All you will need is some used tissue that you received in a gift bag. The more winkles in it, the better. You will also need the Scallop Circle Punch. Mine is the old style. Another thing you will need is a strip of paper; copy paper is just fine. Mine is about 2" wide. You will also need a brad (not shown).
Fold up about 4" or so of the tissue paper.

Fold again so that there are 4 layers about 2" wide.

Put the copy paper in between the layers. Mine is unfolded just to show the paper. This paper is needed for punching. Without it, your punched pieces of tissue will just be a mess.

This photo shows the paper in between the layers, ready for punching.

Now, I have punched once, giving me 4 punched pieces of tissue and one copy paper. You can toss the copy paper pieces or find another use for them. Do this punching three times, so that you will have 12 punched tissue pieces.

You will only need ten of the pieces. Save the other two for another flower. Let me know what you decide to do with those copy paper pieces.

Put five punched pieces together punching the center of each with a brad as you go along. You could use a punch to punch a hole in the center, especially if you are using anything thicker than tissue.

Holding the ends of the brad in one hand, squish the tissue together layer by layer. In this photo, only the first layer has been squished.

This photo shows the five layers all squished together. Now, poke the ends of the brad into one piece at a time of the next five pieces, squishing as you go.

This photo shows all ten layers squished together. Next, you will open the ends of the brad and then start fluffing the layers out until it looks like a flower.
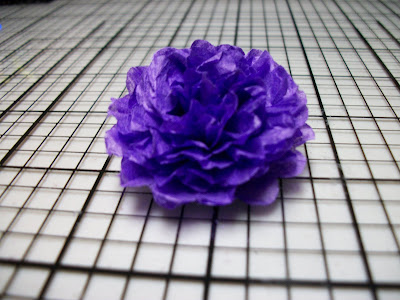
This photo shows all the layers fluffed out. It's starting to look like a real flower now.

This part is optional. I spritzed the flower with Stampin' Up!s Smooch Spritz, Vanilla Shimmer.

After I spritzed it, I dried it with my heat tool. It's ready to add leaves or just adhere to a project.

I used the new "Build-a-Blossom" stamp set and the coordinating punch that will be available from the new Occasions Mini Catalog on January 4, 2011. That's all there is to it! I will add this flower to my next project and post it here for you to see. Thanks for stopping by!!!
 All you will need is some used tissue that you received in a gift bag. The more winkles in it, the better. You will also need the Scallop Circle Punch. Mine is the old style. Another thing you will need is a strip of paper; copy paper is just fine. Mine is about 2" wide. You will also need a brad (not shown).
 Fold up about 4" or so of the tissue paper.
 Fold again so that there are 4 layers about 2" wide.
 Put the copy paper in between the layers. Mine is unfolded just to show the paper. This paper is needed for punching. Without it, your punched pieces of tissue will just be a mess.
 This photo shows the paper in between the layers, ready for punching.
 Now, I have punched once, giving me 4 punched pieces of tissue and one copy paper. You can toss the copy paper pieces or find another use for them. Do this punching three times, so that you will have 12 punched tissue pieces.
 You will only need ten of the pieces. Save the other two for another flower. Let me know what you decide to do with those copy paper pieces.
 Put five punched pieces together punching the center of each with a brad as you go along. You could use a punch to punch a hole in the center, especially if you are using anything thicker than tissue.
 Holding the ends of the brad in one hand, squish the tissue together layer by layer. In this photo, only the first layer has been squished.
 This photo shows the five layers all squished together. Now, poke the ends of the brad into one piece at a time of the next five pieces, squishing as you go.
 This photo shows all ten layers squished together. Next, you will open the ends of the brad and then start fluffing the layers out until it looks like a flower.
 This photo shows all the layers fluffed out. It's starting to look like a real flower now.
 This part is optional. I spritzed the flower with Stampin' Up!s Smooch Spritz, Vanilla Shimmer.
 After I spritzed it, I dried it with my heat tool. It's ready to add leaves or just adhere to a project.
 I used the new "Build-a-Blossom" stamp set and the coordinating punch that will be available from the new Occasions Mini Catalog on January 4, 2011. That's all there is to it! I will add this flower to my next project and post it here for you to see. Thanks for stopping by!!!
2 comments:
The flower is just beautiful. I have a bunch of tissue paper - especially from Christmas gifts already received and I am going to try making some flowers this week-end - can't wait! Thank you so much, CarrollAnn, for taking the time to put this wonderful tutorial on your blog! I'll let you know how it goes. Have a wonderful holiday!
Elisa from Chile: Thanks for this tutorial. I have just finished making lots of these pretty flowers and I am going to use them for a flower topiary. I know it will look great!!! Thanks.
Post a Comment